The pioneering educator Dr. Maria Montessori once said, “The hands are the instruments of man’s intelligence.” This profound insight is the bedrock of effective early childhood education, reminding us that children learn most deeply through active, hands-on, sensory experiences that connect their actions to their understanding.
As partners to the educational community, our mission is to help you consistently bring these valuable opportunities to life. We believe our role extends beyond simply supplying furniture and toys; it’s about providing the tools and ideas that empower you to create powerful learning moments using accessible, everyday materials.
Raised salt painting for kids is a perfect example of this philosophy in action. It is a mesmerizing activity that allows children to feel, create, and observe a scientific reaction in real time, all while producing a stunning piece of art. In this definitive guide, I’ll show you exactly how to bring this powerful learning experience to your students.
What is Salt Painting for Kids?
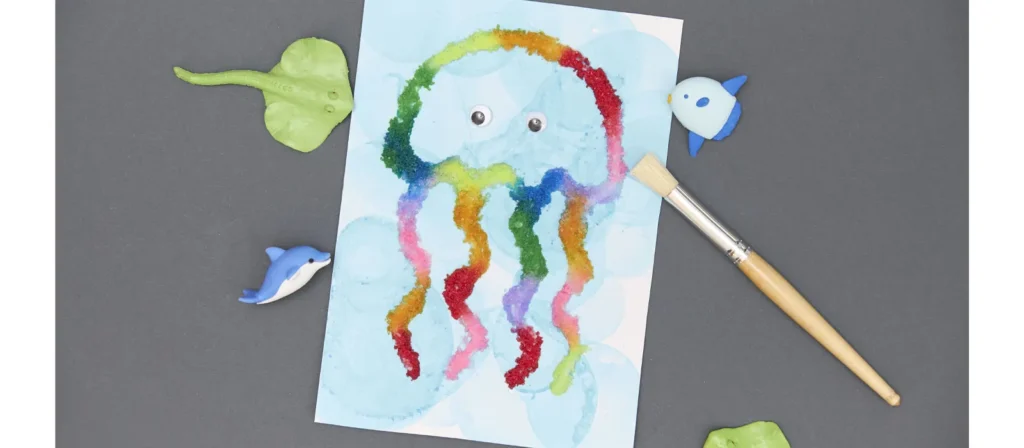
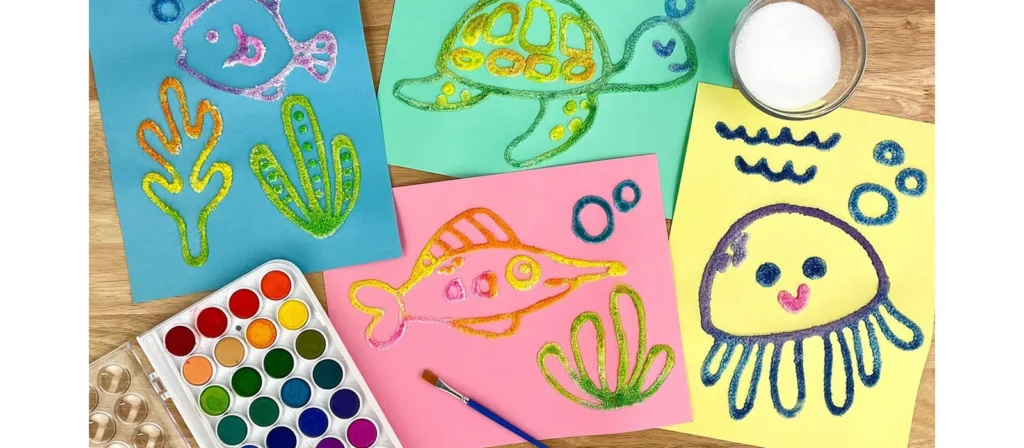
Salt painting is a creative art activity where children use salt, glue, and watercolor paints to create raised, textured designs that sparkle and flow with color. It’s called “raised” painting because the lines of glue and salt create a textured, three-dimensional surface that kids can paint over, watching the colors beautifully spread and blend along the salty trails. This process art technique involves drawing with glue on paper, sprinkling salt over the glue lines, and then dabbing watercolor onto the salt to watch the paint spread like magic.
Unlike traditional painting, salt painting emphasizes exploration over perfection. It encourages young artists to experiment with texture, absorbency, and color blending, offering a multisensory experience that combines visual beauty with tactile engagement. Whether used in preschool classrooms or at home, salt painting is a fun and educational way to foster creativity, fine motor development, and scientific curiosity.
How to Make Raised Salt Painting?
Creating raised salt paintings is surprisingly easy and incredibly fun for kids. This art craft combines simple materials with an exciting process that turns flat artwork into a colorful, textured masterpiece. Follow this step-by-step guide to help children of all ages enjoy the magic of salt painting for kids.
Step 1: Gather Your Materials
Before starting the project, take a few minutes to gather everything you need and set up the workspace. Allowing children to collect the paper, count out brushes, or help pour salt into a small container. By doing so, they not only feel ownership of the project but also practice organization, counting, and responsibility in a playful context.
- White cardstock or thick paper
- White school glue
- Table salt
- Watercolor paints or liquid food coloring
- Paintbrushes, cotton swabs, or droppers
- A tray to catch extra salt
Gathering classroom supplies is a great way to involve children from the very beginning. Ask them questions such as: “What do you think the salt will do?” or “Why might we need thick paper instead of thin paper?” This builds anticipation and encourages them to think critically about the matériel d'art they use.
Step 2: Draw with Glue
Use the glue bottle to squeeze lines, shapes, or patterns on the paper. Children can make simple designs like spirals or zigzags, or create pictures such as flowers, houses, or rainbows. The important part is giving them freedom to explore and experiment with shapes.
While they work, you can guide their thinking by pointing out how the glue flows differently depending on the pressure applied. For example: “What happens if you squeeze harder?” or “Can you make a really thin line?” These prompts help children connect creativity with fine motor practice.
Step 3: Sprinkle Salt Over the Glue
While the glue is still wet, instruct the child to generously sprinkle salt all over their design. Once the glue is completely covered, carefully pick up the paper and tilt it over your tray to let all the excess salt fall away. The salt that doesn’t stick can be funneled back into a container to be used for the next project—a cost-saving aspect of this activity. This step transforms the design into a raised, textured outline that will later hold the colors in place.
Encourage children to observe as the salt clings to the glue. You might ask: “Why do you think the salt only sticks where the glue is?” Questions like this spark curiosity and introduce basic cause-and-effect reasoning.
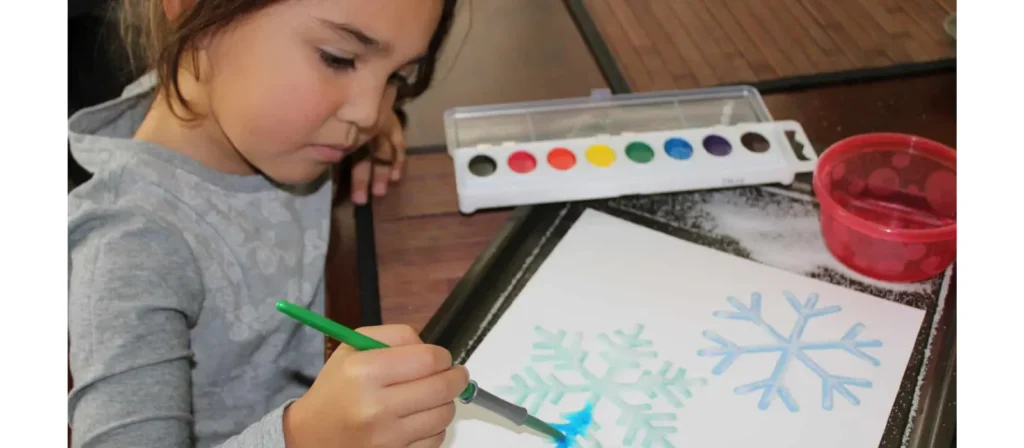
Step 4: Add Color with Watercolors
Now comes the most exciting step—adding color! Dip a brush or dropper into watercolor paint and gently touch the salted glue lines. The paint will spread quickly through the crystals, creating a beautiful effect. Children are often fascinated by this, as it looks almost like magic.
To deepen their engagement, invite them to try different approaches:
- Use one color at a time to see clear patterns.
- Place two colors side by side and watch how they blend.
- Experiment with how much paint they use—just a drop versus a larger brush stroke.
By framing these as playful experiments, you turn the painting process into both an artistic and a scientific exploration.
Step 5: Let It Dry Completely
Once the painting is finished, place it flat in a safe spot to dry. Depending on the thickness of the glue, it may take several hours or overnight. Waiting is an important part of the process, and it teaches children the value of patience.
The next day, revisit the artwork together. Ask them to describe how the painting looks different after drying. Compare it with their earlier observations—“Do the colors look brighter or softer now?” or “How does the texture feel compared to yesterday?” This reflection helps children connect the process with the outcome, reinforcing both creativity and learning.
Benefits of Salt Painting for Kids
Salt painting is more than just an enjoyable art project; it is also a learning experience that supports children’s creativity, motor development, and curiosity. Each stage of the process gives young learners the chance to explore, experiment, and grow while having fun.
Encourages Creativity and Imagination
One of the most rewarding aspects of salt painting is how it inspires children to use their imagination freely. The way watercolor spreads across the salt often surprises them and leads to unexpected outcomes. Instead of focusing on creating a perfect picture, they enjoy the process of discovery and expression. This freedom builds confidence and allows children to see art as a joyful, open-ended experience.
Develops Fine Motor Skills
Salt painting also strengthens motricité fine through simple but precise actions. Squeezing glue bottles, sprinkling salt, and gently applying paint all require careful hand control and coordination. These movements support the development of hand muscles that children will later need for writing, cutting, or tying shoelaces. The best part is that these skills are practiced naturally in a playful, engaging way.
Builds Scientific Curiosity
Another benefit of salt painting is its connection to basic science concepts. Children notice how salt absorbs liquid, how colors spread, and how designs change as they dry. These observations often spark curiosity and lead to questions about cause and effect. By experimenting with different colors and amounts of paint, children are essentially conducting their own small science investigations.
Supports Sensory Exploration
Salt painting is also a rich sensory activity. Children feel the texture of the salt, watch bright colors flow and blend, and observe the final transformation as their artwork dries. Engaging multiple senses makes the experience more memorable and helps children stay focused. It can even provide calming benefits, which is why salt painting is often used in both classroom and therapeutic settings.
Teaches Patience and Process Appreciation
Because salt paintings need time to dry, children quickly realize that they must wait before touching or finishing their artwork. This waiting period helps them practice patience and reflect on the difference between a work in progress and a finished creation. Returning later to see the changes encourages them to value the process as much as the result, nurturing resilience and persistence.
Precautions for Making Salt Painting
While salt painting is simple and fun, a few important precautions will help make the activity safer, smoother, and more enjoyable for both children and adults. Paying attention to these details ensures the process stays creative and stress-free.
Use Safe and Child-Friendly Materials
Always choose non-toxic glue, salt, and paints, especially when working with preschoolers or toddlers. Since children may be tempted to touch or taste the materials, adult supervision is essential. Explaining early on that these supplies are for art and not for eating helps set clear boundaries while keeping the activity safe.
Prepare a Suitable Workspace
Salt painting can be a little messy, so it is best to set up the activity in a controlled area. Place the paper on a tray or baking sheet to catch excess salt and keep paint spills contained. Covering the table with a newspaper or a washable cloth also makes cleanup easier. A well-prepared workspace allows children to focus on the fun instead of worrying about making a mess.
Manage the Amount of Glue and Paint
Too much glue or paint can cause the design to smudge, crumble, or take much longer to dry. Encourage children to squeeze the glue gently and use only small drops of watercolor. This not only helps preserve the artwork but also teaches them about balance, control, and moderation.
Handle the Artwork Carefully While Wet
When the salt is first applied and the colors are still spreading, the painting is very fragile. Moving or tilting the paper can cause the salt to slide off and ruin the design. Remind children to keep their artwork flat and resist the temptation to touch it until it is completely dry. This practice also reinforces patience and respect for their creative process.
Be Aware of Durability
Unlike other crafts, salt paintings are not long-lasting. Over time, salt may flake off and colors may fade. It’s helpful to explain this to children beforehand so they see the project as a process of discovery rather than something to keep forever. Taking a photo of the finished artwork can be a wonderful way to preserve the memory.
FAQ
1. What kind of paint is best for salt painting?
Watercolor paint or liquid food coloring is ideal for salt painting because it spreads easily along the salt lines and produces bright, flowing effects. Thicker paints like acrylics don’t absorb well and can ruin the texture.
2. What does salt painting teach kids?
Salt painting teaches children how to explore cause and effect, improves fine motor skills, and encourages creativity through sensory play. It also introduces basic science concepts in a hands-on way.
3. What is the best salt for salt painting art?
Fine-grain table salt works best for salt painting as it sticks evenly to glue and allows the paint to travel smoothly. Coarse or flaky salts don’t absorb color as well and may fall off more easily.
4. What kind of paper for salt painting?
Cardstock or watercolor paper is recommended because it’s thick enough to support wet glue, salt, and paint without buckling. Thin paper often wrinkles or tears during the process.
5. What age group is salt painting best for?
Raised salt painting is wonderfully adaptable across a range of ages. Toddlers (2-3 years) will love the sensory experience of sprinkling the salt and watching the colors burst. Preschoolers (3-5 years) can master creating intentional shapes and lines with the glue. Older children can create highly detailed artwork and explore more complex color-blending techniques.
6. Why isn’t the color spreading on my salt lines?
- The glue dried: The salt must be sprinkled onto wet glue to adhere properly. If the glue has already started to dry, the salt won’t stick, and the color will have no path to travel.
- The paint is too dry: The magic of this process relies on the absorption of liquid. Make sure your brush or dropper is loaded with plenty of watery paint. If the color is too thick or doesn’t have enough water, it won’t be able to travel along the salt crystals.
Conclusion
Salt painting for kids is more than a simple craft—it is a joyful blend of art, science, and sensory play. Through the process of drawing with glue, sprinkling salt, and adding vibrant colors, children explore creativity while also practicing fine motor control, patience, and problem-solving. The magic of watching colors spread across salt not only excites young learners but also nurtures curiosity about how the world works.
This activity is accessible to all ages and requires only basic materials, making it ideal for classrooms, playgroups, or family time at home. Whether children are experimenting with color mixing, observing how salt absorbs liquid, or simply enjoying the textures, every step provides opportunities for growth and discovery.
While the final artwork may not last forever, the experience of making it leaves a lasting impression. Salt painting reminds us that the creative journey matters more than the finished product. By embracing this perspective, parents and educators can encourage children to explore freely, learn with joy, and see art as a pathway to confidence and imagination.