When we talk about art for preschoolers, what picture comes to mind? Is it often a “perfect” finished product? Perhaps an immaculate paper plate chicken, or a drawing meticulously kept within the lines. We seem conditioned to measure the success of an activity by its final outcome.
But for preschoolers, the true magic of art isn’t found in the fridge-worthy result. The magic is the process itself: it’s the surprise of discovering that two colors can mix to create a new one, the feeling of soft, pliable clay in their small hands, and the pure, immersive joy of tearing, smearing, and pasting.
Long before they can tell complex stories with words, these art activities are a child’s most vital form of expression. Every experience we provide should be about giving them the freedom to express themselves, not handing them a rigid manual they must follow. When a child paints the sky green or draws a person with three arms, they aren’t making a mistake; they are simply understanding and interpreting the world in their own unique way. Our role is not to “correct” them, but to provide a safe space and passionately protect that precious, original expression.
So, how can we set up activities in our daily lives that are both easy to prepare and truly ignite that creative spark? What we need aren’t complex kits or rigid, step-by-step instructions, but simple “invitations to create.” The following 26 ideas are designed for precisely that. They are simple, fun, and focus entirely on the process over the product. They aim to help your child build fine motor skills, develop sensory awareness, and most importantly, give them the freedom to express their wonderful world through laughter and exploration.

26 Art and Craft Ideas for Preschool
Preschool is a time of rapid growth, discovery, and joyful exploration, and few tools are as effective in supporting this stage of development as hands-on art and craft activities. These creative projects do far more than keep little hands busy. They strengthen fine motor skills, build early cognitive foundations, encourage emotional expression, and foster imagination.
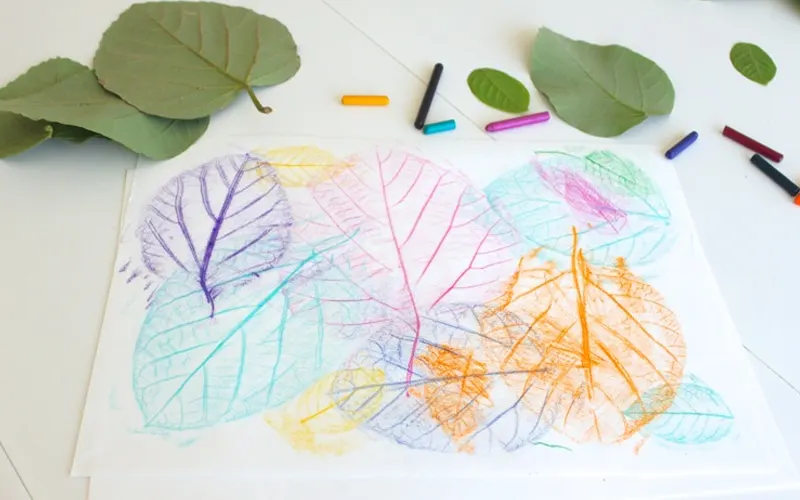
Leaf Rubbing
Overview: Leaf rubbing is a creative art and craft activity that lets preschoolers explore textures in nature. Children place a leaf under paper and rub over it with a crayon to reveal the leaf’s shape and vein patterns. It’s a magical and relaxing way to combine art with nature discovery.
مواد:
- Various leaves (fresh, dry, or flattened)
- ورقة بيضاء
- Crayons (wrappers removed)
- Tape (optional for securing paper)
Preparation:
Go on a little nature walk with the children and collect leaves of different shapes and sizes. Create a calm, clean workspace, like a low table or floor mat, where children can sit comfortably. Place crayons in an open tray with colors sorted. Make sure there’s enough lighting to help children see the textures they are tracing.
Step-by-Step Instructions:
- Place a leaf face down on a flat surface.
- Lay a sheet of paper over the leaf.
- Hold the paper firmly (or tape it down).
- Using the side of a crayon, gently rub over the area where the leaf lies underneath.
- Watch as the leaf’s texture and shape emerge on the paper.
- Repeat with different leaves to create a collage.
Creative: Try turning finished rubbings into greeting cards or bookmarks. Children can cut them out, mount them on colored paper, and add handwritten names or messages to personalize them.
القيمة التعليمية: Leaf rubbings help children develop attention to detail, coordination, and fine motor control. This art and craft activity also introduces early science concepts, such as leaf structure and seasonal change. Children learn to observe, compare, and identify patterns—all key to scientific thinking.
Toilet Paper Roll Animals
Overview: This engaging recycling craft turns empty toilet paper rolls into animals, encouraging creativity, storytelling, and environmental awareness. It’s open-ended and lets kids explore animal traits in a hands-on way.

مواد:
- Safety scissors
- Empty toilet paper rolls
- ورق البناء
- Child-safe glue
- عيون جوجلي
- أقلام التحديد أو أقلام التلوين
Preparation:
Use labeled bins to organize body parts like ears, tails, and wings. Provide visual examples of different animals to spark imagination. Place the rolls in a central basket and create a dedicated “animal building station” with glue and decorations nearby.
Step-by-Step Instructions:
- Choose a toilet roll and decide which animal to make.
- Cover the roll with colored paper or decorate it with markers.
- Glue on cutout features—ears, tail, eyes, feet.
- Add details like whiskers or feathers.
- Display the animals on a class shelf or use them in a story game.
Creative: Create a small animal habitat using shoeboxes. Children can place their finished animal inside and add paper trees, food, or nests for imaginative play.
القيمة التعليمية: This art and craft activity supports early engineering and design thinking as children decide how to construct each animal. It enhances تطوير اللغة through storytelling and strengthens spatial awareness through 3D construction. The reuse of materials introduces basic environmental education.
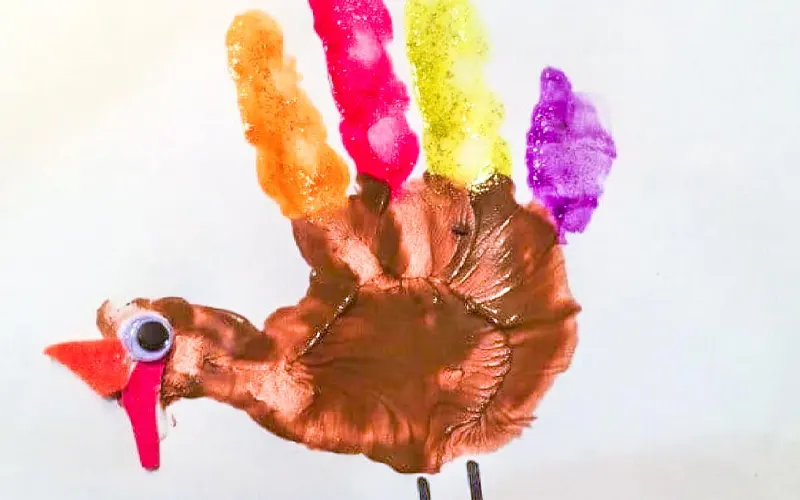
Handprint Turkeys (Thanksgiving)
Overview: Handprint turkeys are a classic fall craft that transforms children’s painted handprints into colorful turkeys. This activity is significant during Thanksgiving, as it allows children to express gratitude in a creative, personal way. It combines tactile exploration, symbolic art, and emotional reflection in a fun seasonal context.
مواد:
- Washable, non-toxic paint
- ورق مقوى أو ورق مقوى
- Paintbrushes or sponges
- علامة سوداء
- Wet wipes or warm washcloths
- Optional: googly eyes, glitter glue, fall-themed stickers
Preparation:
Set up a well-ventilated art space with tables covered in disposable tablecloths or newspapers. Pour small amounts of paint into shallow trays for easy access. Place paintbrushes, wipes, and paper towels at each station. Offer example turkeys on display and discuss what “being thankful” means to build context for the craft.
Step-by-Step Instructions:
- Paint the child’s palm with brown paint (for the turkey’s body).
- Paint each finger a different color (for the feathers).
- Gently press the painted hand onto the cardstock, then lift slowly.
- Let the paint dry for a few minutes.
- Add a beak, eyes, legs, and a red wattle using a marker or paint.
- Have the child dictate or write what they are thankful for underneath the turkey.
- Decorate the background with fall leaves, drawings, or stickers.
Creative: Turn the finished turkeys into a class “Gratitude Wall” or staple them into a Thanksgiving-themed bulletin board. For variety, children can create a family of turkeys using both hands or make a foldable turkey card to bring home as a surprise for their family.
القيمة التعليمية: This art and craft activity fosters emotional development by prompting children to reflect on gratitude and share meaningful thoughts. It also improves fine motor coordination through paint application and detailed drawing. The multisensory experience supports sensory integration, and the cultural context introduces children to traditions in a tangible, inclusive way. By combining art, emotion, and storytelling, this craft enhances both self-awareness and community connection.
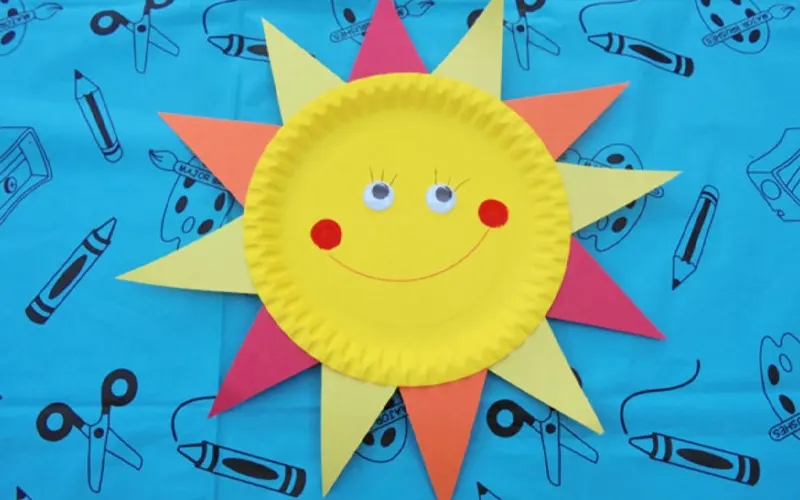
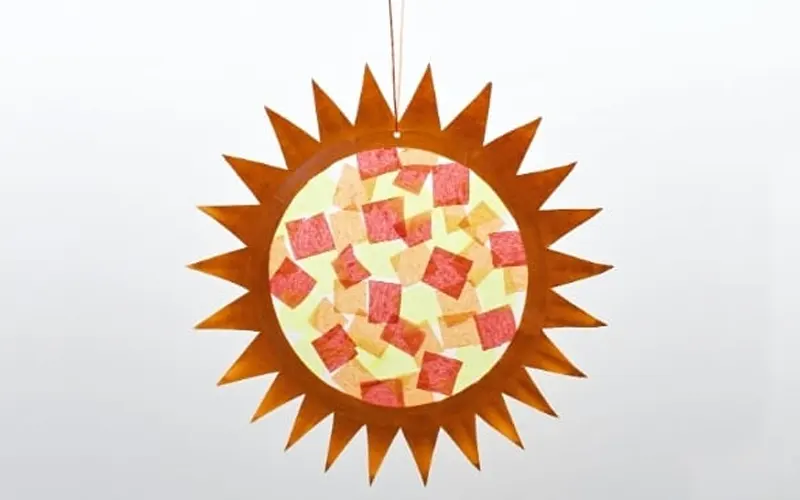
Paper Plate Sun
Overview: The paper plate sun is a joyful craft that encourages preschoolers to explore weather, shape, and self-expression. By creating their version of the sun using scissors, glue, and bright colors, children practice fine motor skills and celebrate the warmth and energy the sun brings.
مواد:
- Plain white paper plates
- Yellow and orange construction paper
- Washable glue sticks
- Safety scissors
- Black marker or crayons
- Googly eyes (optional)
Preparation:
Create a bright, cheerful workspace with sunlight or warm lighting. Place construction paper, scissors, glue, and markers in shared baskets. Offer a few paper plate suns as visual inspiration. Begin the session by talking with the children about what the sun does, how it feels, and why it’s essential.
Step-by-Step Instructions:
- Have each child color or paint the center of the paper plate yellow if desired.
- Give them yellow and orange paper to cut triangle shapes for the sun’s rays. Please encourage them to cut different sizes.
- Glue the triangles around the edge of the plate to create a full circle of rays.
- Let them draw or glue on a face—happy, sleepy, surprised—to give the sun a personality.
- Add names or a short sentence on the back like “My sunny day” or “Shine bright!”
Creative: Extend the art and craft activity into a weather project: children can create other weather faces on paper plates (cloud, rain, rainbow) and hang them as a classroom mobile. Alternatively, turn the sun into a character in a story and let each child tell what their sun “does” during the day.
القيمة التعليمية: This art and craft activity helps children develop scissor control and spatial awareness through hands-on shape cutting and placement. It reinforces basic geometry by introducing triangle shapes and circular design. Through expression and storytelling, it supports social-emotional development and introduces weather-related vocabulary in a creative, age-appropriate way.
Tissue Paper Collage
Overview: The tissue paper collage is a colorful, sensory-rich craft that allows preschoolers to create art from overlapping tissue paper pieces. It’s an open-ended project that emphasizes layering, transparency, and creative freedom, perfect for independent expression.
مواد:
- Tissue paper in various colors
- White glue (diluted with water)
- Paintbrushes or sponges
- Heavyweight paper or cardboard
- Aprons or smocks
Preparation:
Cover tables with plastic or reusable mats. Precut tissue paper into small squares or shapes and place them in color-coded trays. Pour diluted glue into bowls with brushes ready. Encourage kids to feel the lightness of the paper and experiment with colors before beginning.
Step-by-Step Instructions:
- Let the child choose a variety of tissue paper pieces.
- Brush a thin layer of glue onto the base paper.
- Stick the tissue pieces down, overlapping as desired.
- Brush more glue on top to seal the layers.
- Continue until the whole page becomes a vibrant collage.
- Let it dry flat before hanging or displaying.
Creative: Transform finished collages into suncatchers by gluing them onto clear plastic sheets and placing them in windows. Alternatively, cut the dry collage into shapes like hearts, animals, or letters for classroom displays.
القيمة التعليمية: This art and craft activity offers rich opportunities for developing fine motor control. It supports early artistic exploration through color layering and transparency, helping children understand how materials can interact to create new effects. Cognitive flexibility is encouraged as children make spontaneous choices and adjust their designs. Additionally, this craft promotes sensory engagement, patience, and the ability to plan and complete a creative task independently, all of which are essential school-readiness skills.
Rock Painting with Animal Faces
Overview: Rock painting with animal faces blends nature exploration with imaginative art. Children turn ordinary stones into creatures like ladybugs, cats, or frogs, encouraging both observation of real animals and playful invention.

مواد:
- Smooth, clean rocks
- Acrylic paint or tempera paint
- Paintbrushes (small detail size)
- Black marker or paint pens
- Water cup and towels
- Optional: googly eyes, varnish spray for finishing
Preparation:
Take children on a rock-collecting walk or provide a tray of clean stones. Set up an outdoor or washable workspace. Place paints, brushes, and samples of painted animals nearby. Consider offering printed animal photos for reference and discussion.
Step-by-Step Instructions:
- Choose a rock and discuss what animal it could become.
- Paint the base color and let it dry briefly.
- Add features: eyes, ears, whiskers, spots, etc.
- Use a fine-tip marker or paint pen for details.
- If desired, glue on googly eyes for extra personality.
- Let it dry completely before taking it home or using it in play.
Creative: Create a “pet rock zoo” in the classroom or garden. Each child can give their rock animal a name and write a mini story or label to accompany it.
القيمة التعليمية: This art and craft activity enhances creative thinking, hand control, and attention to detail. It encourages outdoor observation and turns found objects into meaningful art. Children also develop symbolic thinking as they imagine and recreate animal features on abstract shapes.
Bubble Wrap Stamping
Overview: Bubble wrap stamping is a fun and textured painting activity that allows preschoolers to explore pattern repetition and sensory play. By using bubble wrap as a printing tool, children discover new ways to create art beyond traditional brushes.
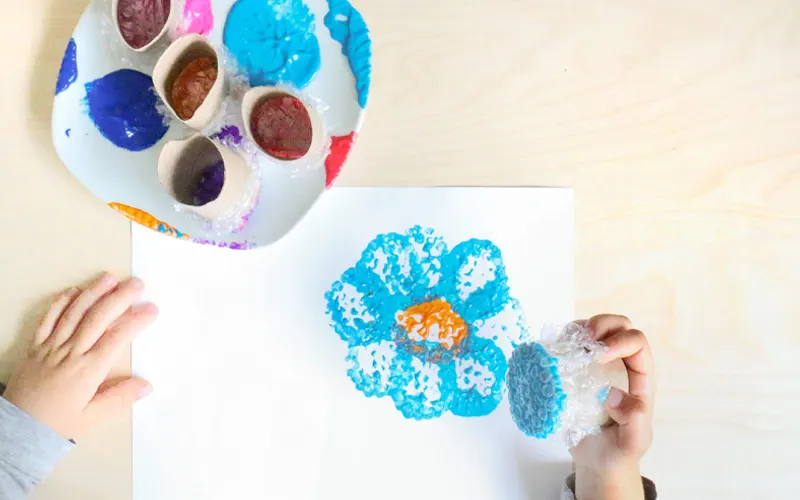
مواد:
- Clean bubble wrap (small-bubble type preferred)
- Washable tempera or poster paint
- Paint trays or shallow plates
- White paper or cardstock
- Tape (optional to secure bubble wrap)
Preparation:
Cut bubble wrap into small rectangles or wrap a piece around a child-safe roller or block. Set up the table with trays of paint in different colors and provide large sheets of paper. Cover the workspace with a plastic cloth or newspaper. Show examples of bubble textures on paper to spark interest.
Step-by-Step Instructions:
- Pour paint into trays and invite children to press the bubble side of the wrap into the paint.
- Help them lift and press it onto the paper like a stamp.
- Repeat to create patterns, layering different colors.
- Encourage free experimentation with overlapping or combining colors.
- Let the artwork dry flat before displaying.
Creative: Cut the finished stamped paper into shapes like fish, balloons, or abstract collages. Alternatively, use the bubble print as a background for drawing scenes or adding animal silhouettes.
القيمة التعليمية:
This art and craft activity helps children explore texture, repetition, and cause-and-effect relationships in art. The physical pressing action improves fine motor coordination and hand strength. It also provides a rich sensory experience, making it especially engaging for tactile learners. Children learn about composition and color mixing in a non-traditional, playful format.
Egg Carton Caterpillars
Overview: Egg carton caterpillars are a charming way to transform everyday waste into imaginative creatures. This craft introduces preschoolers to the concept of insects, body segments, and transformation, while fostering creativity and motor skills.

مواد:
- Cardboard egg cartons
- طلاء قابل للغسل
- فرش الرسم
- عيون جوجلي
- Pipe cleaners (for antennae)
- Glue or glue dots
- Safety scissors
- أقلام التحديد أو أقلام التلوين
Preparation:
Pre-cut the egg cartons into caterpillar-length strips (3 to 5 bumps each). Set out paints and brushes on a covered table, with trays for googly eyes and pipe cleaners. Use a storybook or image of a real caterpillar to start the discussion and link the activity to nature.
Step-by-Step Instructions:
- Let children paint their caterpillar bodies in colors of their choice.
- Allow time for drying, then help them glue on googly eyes to one end.
- Use a pencil to poke two small holes for antennae, then insert and twist pipe cleaners.
- Draw a smile or use markers to add spots and patterns.
- Give each caterpillar a name and let children play with them.
Creative: After making the caterpillars, create a simple obstacle course or “leaf path” on the table where children can move their caterpillars along, turning the craft into a fine motor game and a storytelling experience.
القيمة التعليمية: This art and craft activity supports sequencing and structure understanding by reinforcing the body segment concept. Painting and assembly improve dexterity and hand-eye coordination. The insect theme introduces basic biology, while the open-ended decoration allows for personal expression. Linking the craft to storytelling enhances narrative thinking and listening comprehension.
Puffy Paint Clouds
Overview: Puffy paint clouds offer a dreamy, hands-on way to explore textures, weather, and sky scenes. The special paint mixture creates a three-dimensional, foamy effect that fascinates young children and introduces simple science principles through art.
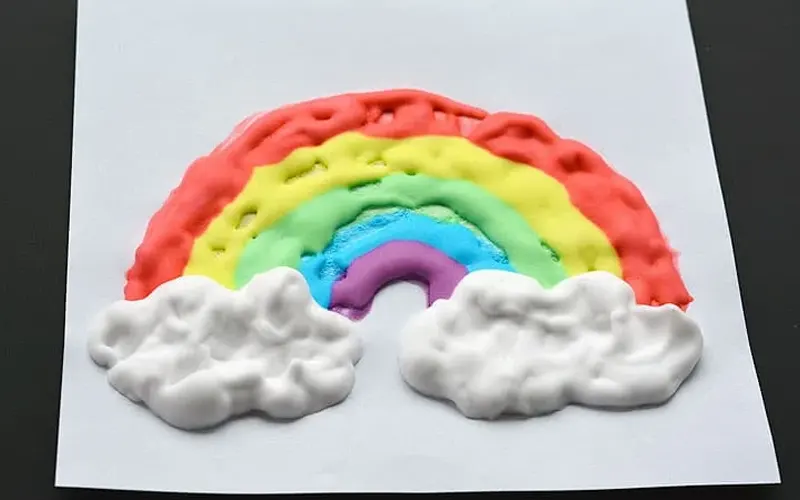
مواد:
- Shaving cream
- White glue
- Mixing bowls and spoons
- ورق سميك أو كرتون
- Paintbrushes or plastic spatulas
- Optional: cotton balls, glitter
Preparation:
Mix equal parts shaving cream and white glue in bowls ahead of time to create “puffy paint.” Set up the table with individual trays and blue construction paper. Discuss what clouds are made of and what different types look like (e.g., fluffy vs. thin).
Step-by-Step Instructions:
- Give each child a dollop of puffy paint and a brush or spoon.
- Let them spread the paint onto blue paper in cloud shapes.
- Encourage children to swirl, dab, or build height for texture.
- Add optional cotton balls or glitter for visual variety.
- Allow artwork to dry overnight; the clouds will remain raised and soft.
Creative: Turn cloud art into a weather journal entry where children draw the sun, rain, or rainbow next to their puffy clouds. Alternatively, combine with a poetry session where each child dictates a short line about their cloud to form a classroom “sky poem.”
القيمة التعليمية: This art and craft activity enhances sensory processing and encourages children to explore visual texture and form. It supports scientific curiosity about weather and atmosphere while developing vocabulary related to nature. The 3D painting process also strengthens fine motor skills and introduces mixing and measuring as early STEM concepts. Emotional expression is supported as children associate their cloud designs with moods, such as “happy sky” or “stormy sky.”
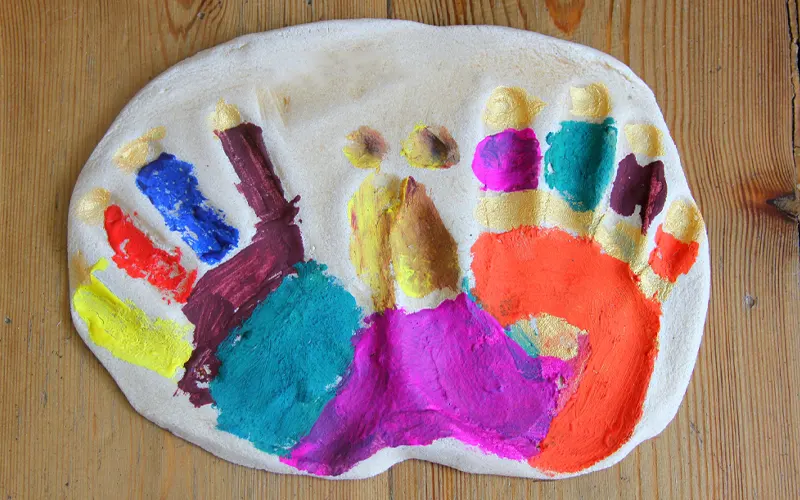
Salt Dough Handprints
Overview: Salt dough handprints are a lasting keepsake activity that allows children to preserve the size and shape of their hands in a creative, sensory-rich project. It’s ideal for building memory, family connection, and self-awareness.
مواد:
- Salt
- Flour
- Water
- Mixing bowl and spoon
- شوبك
- Baking sheet or tray
- Optional: paint, clear varnish
Preparation:
Pre-mix the salt dough with a simple 2:1:1 ratio (flour:salt:water). Divide into small portions for each child. Set up a clean surface with rolling pins and trays ready. Talk with children about how their hands grow and why this moment is special.
Step-by-Step Instructions:
- Help children flatten their dough into a circle or oval.
- Guide them to press their hand firmly into the dough.
- Use a toothpick to write their name and date near the print.
- Let dry naturally for several days or bake at a low temperature to harden.
- Once dry, children can paint and decorate their prints.
Creative: Turn the handprint into a gift by painting it in the child’s favorite colors and tying a ribbon through a small hole at the top for hanging.
القيمة التعليمية: This art and craft activity builds fine motor strength and sensory awareness as children press, roll, and mold the dough. It reinforces identity and memory by capturing a physical moment in time. The drying and decorating stages encourage patience and sequential thinking. It’s also a meaningful way to connect with family or mark milestones in a child’s growth.
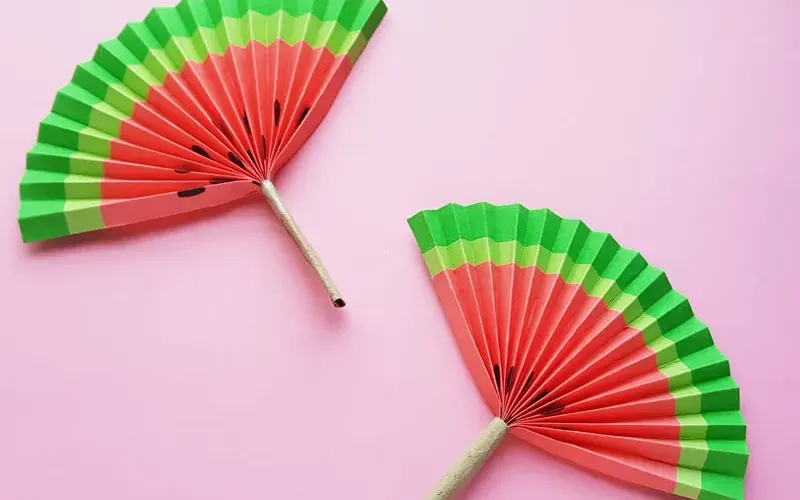
Accordion Fold Paper Fans
Overview: Accordion fold paper fans offer preschoolers a simple introduction to folding techniques and symmetry. This art and craft activity cools them off and builds foundational skills in fine motor coordination and geometry.
مواد:
- Colored or patterned paper
- أقلام التحديد أو أقلام التلوين أو الملصقات
- Glue (optional)
- Craft sticks or straws
- Tape or a stapler
Preparation:
Set out a variety of colored or printed paper options. Demonstrate a finished paper fan and show how folding creates balance and structure. Prepare a calm, seated area where children can fold with supervision and enough space.
Step-by-Step Instructions:
- Let each child choose a sheet of paper.
- Show them how to fold the paper back and forth like an accordion.
- Once folded, pinch the bottom together and tape or staple it.
- Add a craft stick or straw as a handle.
- Decorate the fan with drawings or stickers.
Creative: Children can use their fans as props in a pretend summer parade or weather-themed performance, giving their creation a role in imaginative storytelling.
القيمة التعليمية: This art and craft activity improves bilateral coordination and muscle memory through repetitive folding. It introduces sequencing and spatial awareness, helping children recognize left-right orientation. The decoration step encourages self-expression, while the final product offers a sense of pride and functional use.
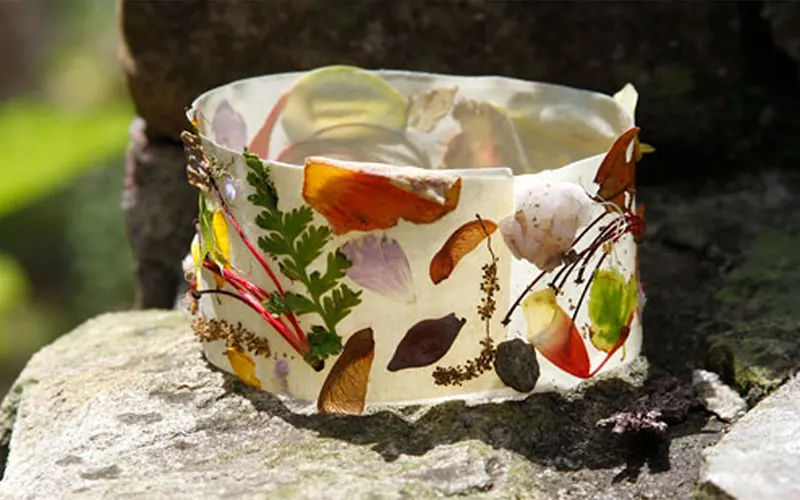
Nature Bracelets
Overview: Nature bracelets are simple crafts that combine outdoor exploration with creative design. Children wear sticky tape around their wrists (sticky side out) and attach small natural items like leaves, petals, or grass as they walk, turning their discoveries into wearable art.
مواد:
- Wide masking tape or painter’s tape
- Natural materials (flowers, leaves, grass, seeds, etc.)
- Safety scissors (optional for trimming pieces)
- Paper bags or baskets (for collection)
Preparation:
Go on a short nature walk with children or prepare a garden area where they can collect items safely. Tear strips of tape in advance and loosely loop them for quick use. Talk about what kinds of items are safe and gentle to pick, reinforcing respect for nature.
Step-by-Step Instructions:
- Wrap a piece of tape around each child’s wrist, sticky side out.
- Invite them to walk around and gently stick small nature items to the tape.
- Encourage discussion about textures, colors, and shapes.
- Once the bracelet is full, press items down lightly to secure them.
- Display bracelets or send them home as a nature souvenir.
Creative: Have children sort their collected items by color or shape before decorating the bracelet to create themed designs (e.g., “all green” or “only petals”).
القيمة التعليمية: This art and craft activity promotes observation skills, environmental awareness, and a gentle, respectful approach to nature. It enhances sensory exploration through touch and visual detail, while also strengthening fine motor skills. Children practice early categorization and decision-making as they choose what to collect and where to place it.
Paper Bag Kites
Overview: Paper bag kites are a lightweight, movement-based craft that brings together creativity and outdoor play. Made from simple materials, these kites can be flown by hand, making them ideal for young children.

مواد:
- Small paper lunch bags
- Streamers or ribbon
- Crayons or markers
- String or yarn
- شريط أو غراء
- مثقب
Preparation:
Lay out bags, streamers, and decorating materials on a large table. Pre-punch two holes near the open end of each bag for the kite string. Talk with children about wind and how kites move, connecting the activity to outdoor science.
Step-by-Step Instructions:
- Invite children to decorate their paper bags using markers or stickers.
- Tie streamers to the bottom of the bag for a tail.
- Thread the string through the top holes and tie to form a handle.
- Take the kites outside and run to watch them fly behind.
- Encourage children to describe how the kite moves in the air.
Creative: Host a mini kite parade where each child shows off their decorated kite and gives it a name or character role in a group storytelling activity.
القيمة التعليمية: This project connects art and physical activity, encouraging children to express themselves creatively and then test their design in motion. It supports gross motor development through running and coordination, while also introducing basic science concepts like wind, lift, and air resistance in an accessible way.
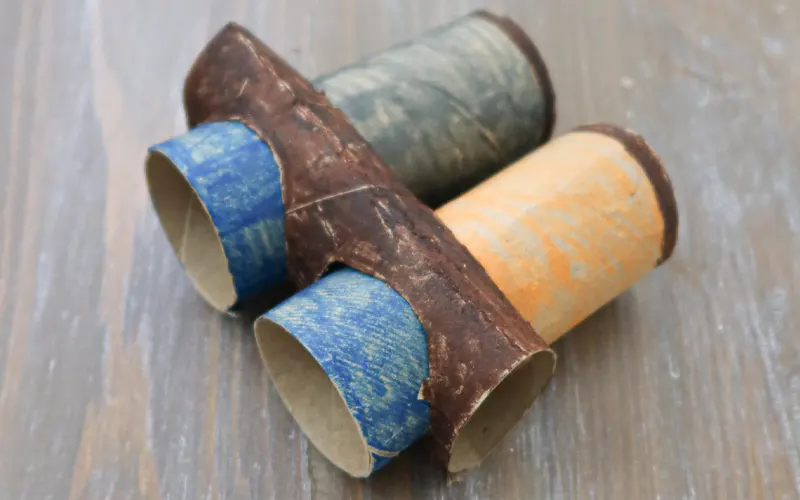
DIY Binoculars
Overview: DIY binoculars are a fun and easy craft that helps children prepare for pretend adventures and observation games. Made from recycled toilet paper rolls, this project sparks curiosity and encourages exploration of the world around them.
مواد:
- Two empty toilet paper rolls per child
- شريط أو غراء
- String or yarn (for neck strap)
- مثقب
- Markers, stickers, and paper for decorating
Preparation:
Tape pairs of rolls together or pre-punch holes for straps if needed. Set up a decoration station with themed stickers (e.g., animals, stars). Discuss how binoculars are used and what kinds of things explorers look for.
Step-by-Step Instructions:
- Help children tape or glue two rolls side by side.
- Let them decorate the outside with colors, shapes, or stickers.
- Punch a hole in each roll and tie a string to make a wearable strap.
- Try them on and practice looking around the room or outside.
- Go on a short observation walk to “spot” things in the environment.
Creative: Set up a scavenger hunt where children use their binoculars to find items by color or shape, encouraging playful interaction with their surroundings.
القيمة التعليمية: This project enhances visual tracking and imaginative play. It introduces children to basic tools of observation and supports gross motor movement when used during exploration. Making and using binoculars encourages curiosity, independence, and confidence in interacting with the natural world.
Cotton Ball Snowman
Overview: This cotton ball snowman is a cheerful winter craft that turns fluffy cotton into a friendly snowman with arms, a Santa hat, and a bright personality. Inspired by the holidays, this version includes festive details like red mittens and a classic carrot nose, blending sensory play with seasonal celebration.

مواد:
- Cardstock or sturdy backing paper
- كرات القطن
- ورق
- Craft sticks
- Small white pom-pom
- غراء
- مقص
Preparation:
Pre-cut red hats, mittens, and orange carrot noses for easier assembly. Prepare black dots for eyes and buttons, or provide a black marker for drawing. Arrange cotton balls in bowls and all paper elements in small sorting trays. Cover work surfaces with paper or plastic to catch stray cotton.
Step-by-Step Instructions:
- Help children outline three connected circles on the base paper as a guide for the snowman’s shape.
- Apply glue inside the circles and stick cotton balls closely together to fill each one, forming the snowman’s body.
- Glue on black paper circles for eyes, mouth, and buttons, and an orange triangle for the nose.
- Attach brown strips or craft sticks as arms on each side.
- Add red mittens to the arms and a red hat with a white pom-pom on top.
- Let it dry flat before displaying.
Creative: Invite children to add more winter elements like snowflakes, stars, or a paper scarf in their favorite color. They can also name their snowman and tell a short winter story about what it likes to do in the snow.
القيمة التعليمية: This art and craft activity strengthens fine motor skills through precise placement of small items and tactile handling of cotton balls. It encourages attention to sequencing and builds spatial awareness. By connecting the activity to winter and holiday themes, it fosters seasonal understanding, vocabulary development, and joyful engagement through creative self-expression.
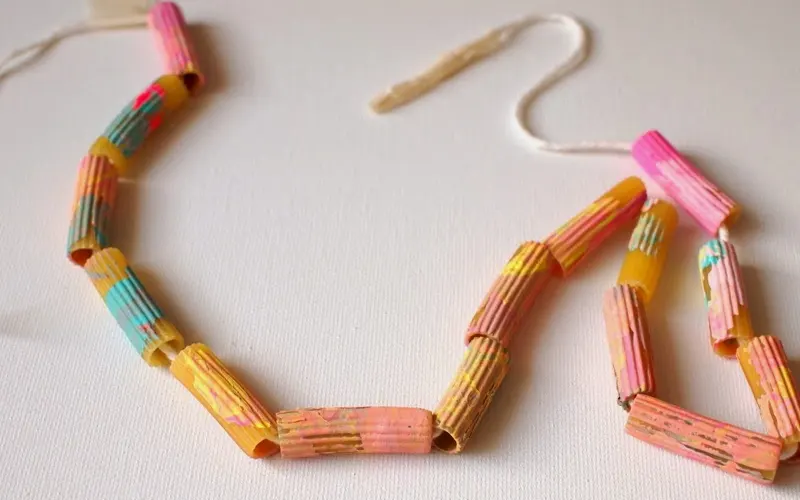
Pasta Necklace Craft
Overview: Pasta necklaces are a timeless preschool craft that combines fine motor skill development with color recognition and pattern making. Children thread pasta onto yarn to create wearable art, practicing coordination and sequencing.
مواد:
- Dry pasta
- Food coloring and vinegar (for dyeing pasta)
- Zip-top bags
- Yarn or string
- Tape (for stiffening one end of yarn)
- مقص
مواد:
- Dry pasta (tube-shaped like penne or rigatoni)
- Food coloring and vinegar (for dyeing pasta)
- Zip-top bags
- Yarn or string
- Tape (for stiffening one end of yarn)
- مقص
Preparation:
Pre-dye pasta by mixing food coloring, vinegar, and pasta in zip bags; let dry completely on wax paper. Cut yarn into necklace lengths and tape one end for easy threading. Set out pasta in bowls by color and provide examples of simple patterns.
Step-by-Step Instructions:
- Let children choose their yarn and colors of pasta.
- Demonstrate how to thread pasta onto the stiff end of the yarn.
- Encourage them to create patterns or alternate colors.
- When full, help tie the ends together into a necklace.
- Let them wear or take home their creation.
Creative: Children can sort pasta before threading and create themed necklaces—rainbow, two-tone, or matching their favorite outfit color.
القيمة التعليمية: This art and craft activity improves hand-eye coordination, strengthens finger muscles, and introduces early math skills like patterning, sequencing, and counting. It also builds independence and confidence through creating something functional and beautiful.
Feathered Bird Craft
Overview: The feathered bird craft brings nature and creativity together as children build colorful birds using paper and real or craft feathers. It’s a lively introduction to birds, wings, and movement.

مواد:
- Construction paper (bird body templates)
- Feathers (craft feathers or natural)
- عيون جوجلي
- غراء
- مقص
- أقلام التحديد أو أقلام التلوين
Preparation:
Pre-cut simple bird body shapes from colored paper. Set up trays of feathers and other decorative materials. Display real bird images or play bird sounds to help children connect the craft to real-life animals.
Step-by-Step Instructions:
- Let each child choose a bird body and color it.
- Glue feathers onto the wings and tail area.
- Add a googly eye and a drawn or cut-out beak.
- Draw or add feet if desired.
- Let dry and create a “bird wall” display in the classroom.
Creative: Children can invent their own species of bird, choosing colors and feather arrangements to match a name and personality they create.
القيمة التعليمية: This art and craft activity promotes fine motor control and sensory integration through feather handling and precise gluing. It encourages curiosity about birds, habitats, and movement. Children build creative confidence by inventing their own birds and sharing them with peers.
Q-Tip Fireworks Painting
Overview: Q-tip fireworks painting uses cotton swabs as tiny brushes to create colorful explosion patterns on paper. It’s a fantastic craft for holidays like New Year’s or the Fourth of July and teaches controlled movement and visual symmetry.

مواد:
- Q-tips
- Washable paint in bright colors
- Dark-colored paper (black, navy)
- Paper plates or palettes
- Optional: glitter glue
Preparation:
Prepare small paint trays and cut Q-tips in half if needed. Demonstrate the dabbing technique on dark paper to show the bursting effect. Set up drying areas and protect clothing with aprons.
Step-by-Step Instructions:
- Dip the Q-tip into a bright paint color.
- Dab outward in a circle to form a fireworks burst.
- Switch colors and repeat in different spots on the paper.
- Add glitter or white dots for stars.
- Let the artwork dry completely.
Creative: Pair this activity with a group poem or story about nighttime celebrations, letting children draw inspiration from fireworks they’ve seen.
القيمة التعليمية: This art and craft activity refines motor skills through small, precise movements. It introduces radial symmetry and pattern-making, supporting visual-spatial understanding. Children also build narrative and memory recall by connecting the art to past experiences, like festivals or holidays.
Handprint Tree Craft
Overview: The handprint tree is a meaningful art project where children use their handprints as tree branches or leaves. It’s perfect for themes like family, seasons, or nature, and helps children recognize their own uniqueness in art.

مواد:
- Brown construction paper (for trunk)
- White or colored background paper
- طلاء قابل للغسل
- فرش الرسم
- Scissors and glue
- Wet wipes or wash basins
Preparation:
Pre-cut tree trunks or let children draw them. Prepare paint trays and smocks. Talk briefly about how trees grow, and how their roots will become the “branches” or “leaves.”
Step-by-Step Instructions:
- Paint the child’s hand with green, orange, or red paint.
- Press their hand around the top of the tree trunk to make leaves.
- Repeat with different colors for seasonal effects.
- Let them add falling leaves or draw a background.
- Allow artwork to dry before displaying.
Creative: Turn the tree into a “family tree” by writing each family member’s name on a handprint, showing how different branches are part of one whole.
القيمة التعليمية: This art and craft activity promotes body awareness, seasonal understanding, and personal identity. It strengthens motor coordination and reinforces color use. Creating connections between handprints and trees encourages children to think symbolically and see themselves in their environment.
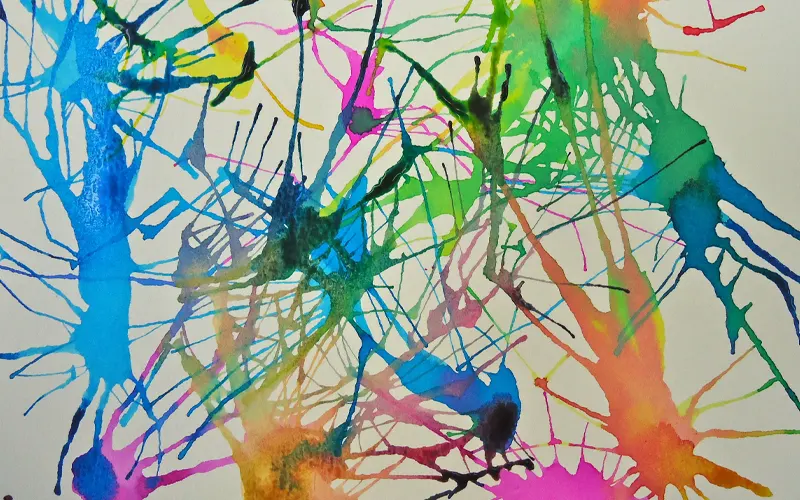
Straw Blowing Art
Overview: Straw blowing art is an abstract and fun way for children to explore air pressure, movement, and color blending. Using straws to blow paint across paper results in unpredictable and exciting designs.
مواد:
- Washable liquid paint (thinned with a little water)
- Drinking straws
- ورقة بيضاء
- Paint droppers or spoons
- Smocks or aprons
Preparation:
Pre-mix paint in small bowls. Place droppers or spoons in each to help children transfer paint. Lay paper on trays or cover tables. Remind children to blow, not suck, through the straws.
Step-by-Step Instructions:
- Drop small amounts of paint onto paper.
- Use a straw to blow the paint gently in different directions.
- Repeat with different colors to see how they mix.
- Let the paint dry and observe the unique shapes formed.
- Discuss the results and what they “see” in the shapes.
Creative: Let children turn the finished art into a monster, alien, or insect by drawing eyes and legs on the dried paint trails.
القيمة التعليمية: This art and craft activity teaches early physics through force and direction. It develops oral motor strength and control, which is often beneficial for speech development. The unpredictable outcome also nurtures flexible thinking and creativity.
Paper Mosaic Letters
Overview: Paper mosaic letters allow children to decorate a letter (often their initial) by gluing down small pieces of colored paper, creating a vibrant, textured design. It’s ideal for name recognition and early literacy support.
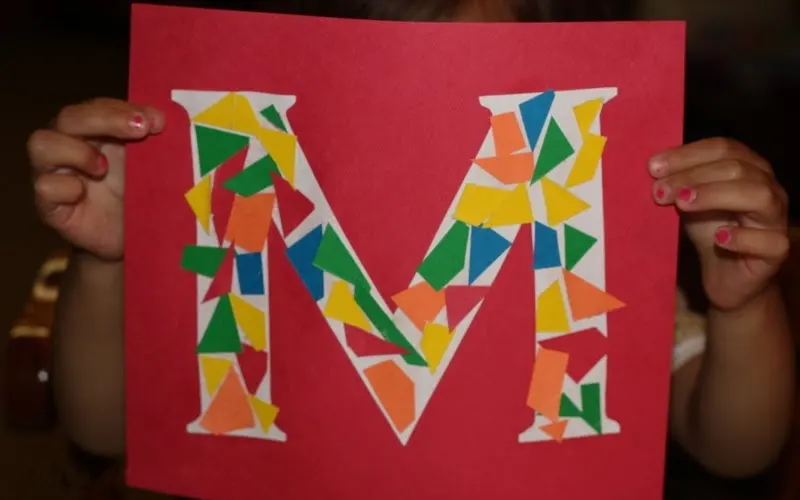
مواد:
- Large paper letters (pre-cut or traced)
- Colorful paper scraps (cut into small squares)
- غراء
- Construction paper for mounting
Preparation:
Print or cut large letters ahead of time. Sort colored paper scraps by hue. Talk with children about the sounds letters make and how they appear in their names.
Step-by-Step Instructions:
- Give each child their letter on a blank sheet.
- Let them glue small paper squares to fill the shape.
- Encourage overlapping or patterning for visual interest.
- Mount the finished letter on a contrasting background.
- Label with the child’s name if desired.
Creative: Create a classroom alphabet wall using each child’s decorated initial, helping them see themselves as part of the letter-learning journey.
القيمة التعليمية: This art and craft activity reinforces name and letter recognition, phonemic awareness, and beginning sound identification. It strengthens fine motor precision through gluing and builds pride in personal identity and language development.
Sun Catcher Circles
Overview: Sun catcher circles are beautiful translucent crafts made with tissue paper and contact paper, designed to hang in windows and catch the light. Children explore color blending, transparency, and circular composition.
مواد:
- ورق اتصال شفاف
- Tissue paper (variety of colors)
- مقص
- Paper plates (optional for frame)
- String for hanging
Preparation:
Pre-cut contact paper into large circles and mount sticky-side-up on the table. Tear or cut tissue paper into small pieces and place them in trays, sorted by color. Demonstrate how overlapping changes the colors.
Step-by-Step Instructions:
- Encourage children to place tissue paper pieces on the sticky surface.
- Overlap pieces to explore color blending.
- Cover with a second piece of contact paper to seal.
- (Optional) Frame the circle using a cut paper plate rim.
- Punch a hole and add a string for hanging.
Creative: Use the sun catchers as part of a classroom “weather window,” labeling each child’s artwork with words like “sunny,” “warm,” or “colorful.”
القيمة التعليمية: This activity supports visual discrimination, color theory, and sensory engagement. It strengthens fine motor skills through paper placement and introduces properties of light and transparency. Children gain pride in creating something that transforms with sunlight.
Shape Collage Robot
Overview: Shape collage robots invite children to build robots using only geometric paper shapes. It’s a playful introduction to 2D shapes and spatial design, combining math with imagination.
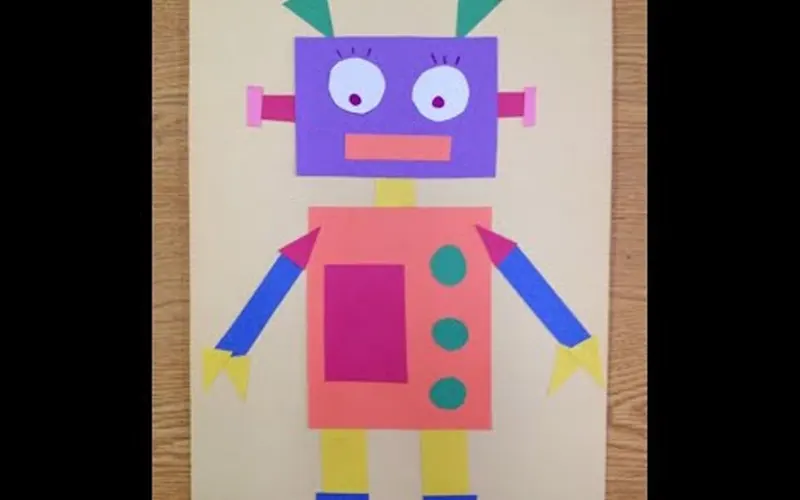
مواد:
- Pre-cut paper shapes (squares, rectangles, triangles, circles, etc.)
- Construction paper (background)
- Glue sticks
- علامات
- Googly eyes (optional)
Preparation:
Sort shapes by type in labeled trays. Offer examples of basic robots for visual reference. Talk about how robots can look different and what shapes might make a body, arms, or head.
Step-by-Step Instructions:
- Let children select shapes for each robot part: head, body, limbs, etc.
- Glue shapes onto the background paper to assemble their robot.
- Add facial features and buttons using markers or extra shapes.
- Give the robot a name and maybe a “job.”
- Display in a class robot gallery.
Creative: Children can give their robot a superpower or special skill and describe what it helps people with, combining design with storytelling.
القيمة التعليمية: This art and craft activity introduces geometry and positional language (on top, next to, below). It develops decision-making and visual planning skills. The combination of art and narrative helps children connect design with function and emotion.
Paper Bag Puppets
Overview: Paper bag puppets are character-based crafts that children can bring to life through pretend play. They use paper lunch bags and simple materials to create animals, people, or made-up creatures.

مواد:
- Brown or white paper lunch bags
- ورق البناء
- غراء
- مقص
- Crayons or markers
- Googly eyes, yarn, or felt scraps (optional)
Preparation:
Fold a paper bag to show the puppet’s “mouth” flap. Prepare trays of facial feature shapes (eyes, noses, ears, etc.). Provide templates or examples of animals and people for inspiration.
Step-by-Step Instructions:
- Choose a theme for the puppet (animal, person, etc.).
- Decorate the flap as the face and the body area below it.
- Add eyes, ears, and hair with paper, yarn, or other materials.
- Let dry, then use the puppet in storytelling or song time.
- Encourage children to voice their puppet’s name and story.
Creative: Set up a “puppet theater” corner where children can perform short shows using their characters, encouraging group collaboration.
القيمة التعليمية: This art and craft activity supports imaginative thinking, oral language development, and social-emotional expression. It builds coordination through assembling small parts and boosts confidence as children present and interact using their handmade puppet.
Watercolor Resist Painting
Overview: Watercolor resist painting introduces children to layering techniques using crayons and watercolor paints. The crayon marks repel the paint, creating a visual contrast that feels magical and encourages experimentation with lines and color blending.

مواد:
- White crayons or oil pastels
- Watercolor paints
- فرش الرسم
- Water cups and paper towels
- Watercolor or thick drawing paper
مواد:
- White crayons or oil pastels
- Watercolor paints
- فرش الرسم
- Water cups and paper towels
- Watercolor or thick drawing paper
Preparation:
Set out materials on a well-lit table covered with a plastic cloth. Offer examples showing how crayon marks resist the watercolor paint. Encourage children to experiment with drawing shapes or writing letters before painting.
Step-by-Step Instructions:
- Have children draw with a white crayon on white paper (invisible at first).
- Once ready, begin painting over the entire sheet with watercolor.
- Watch as the crayon drawings appear through the paint.
- Allow them to add more color or mix shades to enhance the design.
- Let the paintings dry flat and display them as a gallery of “magic art.”
Creative: Invite children to draw secret messages or invisible images with crayons before painting, then reveal them like a “mystery” as the watercolor spreads.
القيمة التعليمية: This art and craft activity supports early science learning about resistance and materials. It builds observation skills and patience as children wait for their drawings to emerge. Fine motor development and creativity are strengthened through controlled drawing and expressive painting.
Nature Collage Boards
Overview: Nature collage boards combine creativity with environmental awareness. Children collect natural materials and arrange them into textured artworks, promoting close observation and artistic composition.

مواد:
- Cardboard bases (cut from boxes)
- Leaves, twigs, seeds, flowers, bark, grass
- White glue
- Magnifying glasses (optional)
- Optional: labels or markers
Preparation:
Organize a nature walk or scavenger hunt to collect materials. Set up a collage station with trays and glue. Encourage children to look closely at textures and shapes using magnifying glasses before gluing.
Step-by-Step Instructions:
- Invite children to sort collected materials by texture, color, or size.
- Plan out a design or let them work freely.
- Apply glue to the board and arrange items carefully.
- Add labels or draw outlines if desired.
- Let dry and share creations during a class “nature show.”
Creative: Children can group their materials into themed art (e.g., “forest floor,” “windy day,” “tiny forest”) and describe what each item represents.
القيمة التعليمية: This art and craft activity builds respect for nature and develops sorting, classifying, and design skills. It improves focus and coordination while connecting art with environmental science. Children express themselves through natural textures, enhancing both creativity and ecological literacy.
Ready to Bring These Ideas to Life?
Don’t let a missing glue stick stop the fun. We provide a complete range of high-quality, non-toxic Art and Craft Supplies for Preschoolers. Find everything from washable paints and crayons to bulk craft paper and modeling clay, all curated for safety and maximum creative potential.
Browse Art SuppliesSetting Up an Art-Friendly Classroom Environment
Creating an art-friendly بيئة الفصل الدراسي is essential for encouraging preschoolers to explore, express, and engage through creativity. An effective space doesn’t have to be large or elaborate—it just needs to be accessible, inviting, and well-organized, fostering both independence and imagination. Here are key strategies and elements to consider when designing an art-friendly environment for young children:

- Designate a Specific Art Area:
Choose a consistent space where art activities will take place. Ideally, it should be near a sink for easy cleanup and away from distractions or quiet learning zones. - Use Child-Accessible Storage:
Store materials in low, open storage or bins labeled with both pictures and words. This encourages children to select, use, and return materials independently. - Provide a Variety of Surfaces:
Include easels for vertical painting, flat tables for drawing and crafting, and floor space with mats for large or group projects. - Display Inspirational Examples:
Decorate the area with children’s past artwork, photos of real artists at work, or simple visual guides (e.g., shape charts or color wheels). - Ensure Easy Clean-Up:
Have wipes, aprons, table covers, and drying racks readily available. Include visual routines for cleaning and organizing to build responsibility. - Offer Open-Ended Materials:
Keep a variety of DIY craft materials like paper scraps, recycled objects, and natural items accessible. This promotes imaginative thinking and resourcefulness. - Include Quiet Observation Options:
Not every child jumps into art right away—provide a small chair or art book corner for quiet inspiration before creating. - Ensure Safety and Supervision:
Use non-toxic, age-appropriate supplies, and store sharp tools out of reach unless in direct use. Review safety expectations clearly and often. - Rotate Supplies and Themes:
Refresh materials seasonally or by theme (e.g., fall leaves, shapes, textures) to keep the space dynamic and relevant to ongoing curriculum topics.
Art and Craft Supplies for Preschoolers
To make the most of art and craft ideas for preschool, having a well-stocked supply of basic and creative materials is essential. Here’s a complete list of commonly used art and craft supplies for preschoolers, designed to support a wide variety of fun and educational projects:

Basic Drawing and Coloring Tools
- Crayons (jumbo size for easier grip)
- Washable markers
- Colored pencils
- Watercolor paints
- Oil pastels (non-toxic)
Cutting and Sticking Tools
- Child-safe scissors (blunt tip)
- Glue sticks
- White liquid glue
- Tape (clear and masking)
- Staplers (with supervision)
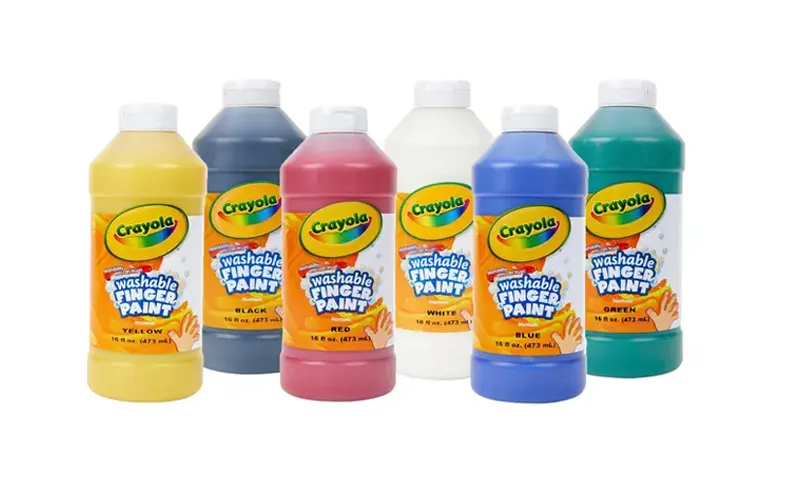
Painting Essentials
- Washable tempera paints
- Finger paints
- Paintbrushes (various sizes)
- Paint trays or palettes
- Aprons or smocks
- Water cups and paper towels
Paper Materials
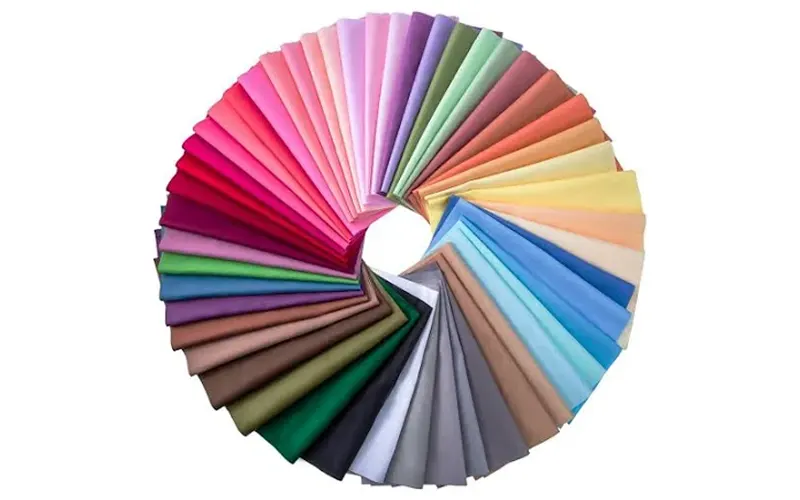
- Construction paper (variety of colors)
- White drawing paper
- ورق المناديل
- Cardstock
- Paper plates
- Paper bags (brown lunch size)
- Coffee filters
DIY Craft Embellishments
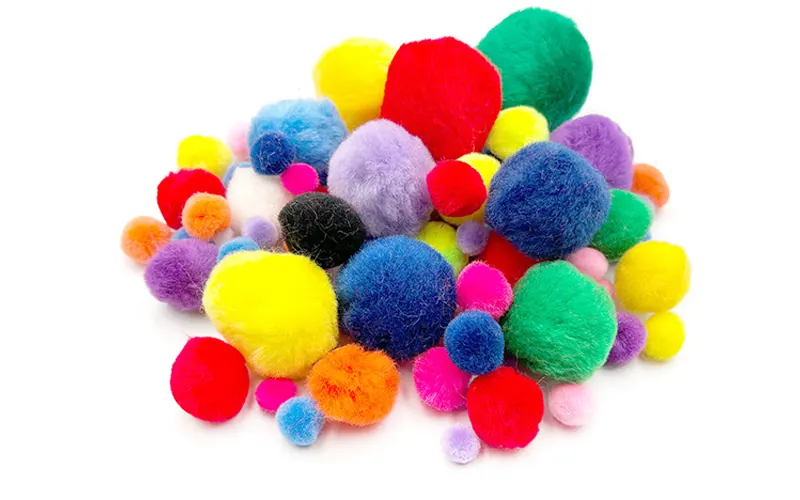
- عيون جوجلي
- بوم بوم
- منظفات الأنابيب
- Feathers
- Buttons
- Sequins
- Beads (large size)
- Foam shapes or sheets
- ملصقات
Textiles and Sensory Materials
- كرات القطن
- Yarn or string
- Felt pieces
- Fabric scraps
- شريط

Recyclable and Natural Items
- Toilet paper rolls
- Egg cartons
- Cereal boxes
- Bottle caps
- Leaves, twigs, pinecones
- Pebbles or small rocks
Adhesive Surfaces and Tools
- Contact paper
- Magnets (for crafts with display purposes)
- Craft sticks (popsicle sticks)
- Hole punchers

خاتمة
We truly hope these 15 ideas have inspired you to focus more on the process, rather than the “product,” during your time with your child. Remember, the real purpose behind sharing these Art and Craft Ideas for Preschool isn’t to end up with a perfect painting; it’s about witnessing those engaged eyes, those messy, paint-covered hands, and the bursts of laughter that come with discovery.
Every time you offer these materials and opportunities, you are giving your child a precious gift: the confidence to explore, the freedom to express their unique vision, and the simple, profound joy of being completely lost in the act of creating. So go ahead, clear a space, embrace the beautiful mess, and watch your child’s creativity take flight.